# Modifying Parts
{% hint style="info" %}
You can modify every field of every part during runtime and the changes will be reflected in the vehicle's performance. This gives you the ability to design the vehicle's behavior in a quick way.
{% endhint %}
{% hint style="info" %}
ScriptableObjects field values save all the changes you make during development in the editor, but not in the build, that's the feature of ScriptableObjects.
However, the changes to which scriptable object parts the controller uses that were made during runtime are reset, as well as the value type fields (such as CustomizableSet object fields, used preset field, SteerSpeed, and DrivetrainType).
To save the changes made during play mode, check the following toggle:

{% endhint %}
## Acceleration parts
{% tabs %}
{% tab title="Engine" %}
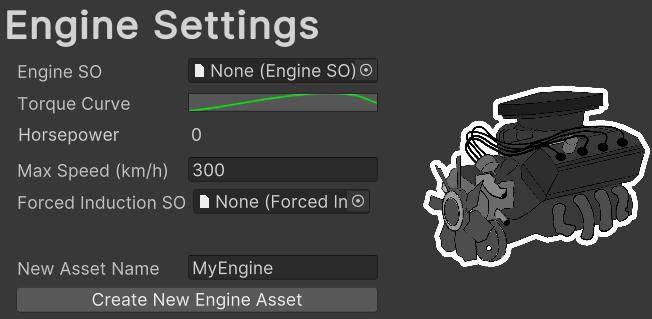
The engine provides torque to the drive wheels of the vehicle.
***
## Torque Curve
To change the properties of the engine, open TorqueCurve.
{% hint style="info" %}
You can zoom into the curve by pressing "F" in the opened AnimationCurve window.
{% endhint %}
Torque Curve looks like this:
Where the X-axis represents the rpm, the Y-axis - the amount of torque.
The leftmost key is the idle rpm of the engine. Idle rpm can't be less than 0.
The rightmost key is the maximum rpm the engine can handle.
***
## Horsepower
The horsepower label shows the approximate amount of horsepower the engine can produce, taking into account additional boost from the forced induction system.
{% hint style="info" %}
Horsepower = peak torque value \* peak torque rpm / 5252 + boost from forced induction
{% endhint %}
***
## Max Speed
The max speed field defines the maximum speed that the engine can handle. If the car tries to go beyond this maximum, the opposite force would be applied.
{% hint style="info" %}
It's not necessary to have a unique value for each engine. You can set the same max speed for every vehicle, making it the in-game limit. Artificially limiting the top speed can help with collision handling.
{% endhint %}
{% hint style="info" %}
Note that the speed is in kilometers per hour.
{% endhint %}
{% hint style="info" %}
Other parts, namely tires, and body, rely on the value of (current car speed / max car speed) for calculations, so keep the max speed value reasonable.
{% endhint %}
***
## [Forced Induction](#forced-induction-1)
An optional field where you can assign a Forced Induction Scriptable Object.
{% hint style="info" %}
As of update 2.1.0, ForcedInductionSO was separated from the EngineSO instance for better performance customization. Now you can assign ForcedInductionSO directly onto the CustomVehicleController.
{% endhint %}
{% endtab %}
{% tab title="Forced Induction" %}
Forced induction provides an additional boost to the engine.
***
## Forced induction type.
The way the boost is provided depends on the forced induction type.
* Turbocharger: isn't working until certain engine rpm. Takes time to achieve full effect. Boost depends on gas input.
* Supercharger: constant boost.
* Centrifugal: boost is directly tied to engine rpm.
* None: no boost.
***
## Max Pressure Boost
The maximum pressure boost (in PSI) that this forced induction system can provide to the engine. The performance output of the engine with a forced induction system is calculated as `(a base torque that the engine produces + torque from the custom engine parts) * (1 + Max Boost Pressure * 0.07).`
Therefore, installing a 30 PSI Turbo system for a 500 HP engine would result in 1550 HP
***
## Turbocharger-specific fields
### Turbo Lag
Turbo lag defines the working range of the turbo. Turbo doesn't work until the engine reaches the given rpm percent.
### Turbo Spool Up Time
Turbo Spool Up Time defines how quickly the turbo will reach maximum boost (in seconds).
### Turbo Spool Down Time
Turbo Spool Down Time defines how quickly the turbo will stop spinning, starting from the max boost. The actual time will be a little bit higher as a turbo slows down by exponentially decaying.
`BoostPercent -= Time.deltaTime / SpoolDownSpeed * BoostPercent;`
### AntiLag System
AntiLag system helps to keep the boost at high levels. The conditions for triggering the AntiLag system are the following:
1. The Turbo is at maximum boost and the player lets go of gas.
2. The Turbo is at maximum boost and the car changes gears.
After one of the conditions becomes true, the AntiLag system starts working and slows down the rate at which the turbo loses boost. If the player presses the gas pedal, the AntiLag system gets disabled.
### AntiLag Effect Strength
The AntiLag Effect Strength affects the spool down time of the turbo. It acts as a multiplier to the spool down time:
`SpoolDownTimeWithAntiLag = TurboSpoolDownTime / (1 - AntiLagEffectStrength)`
Therefore, if the value of the AntiLag Effect Strength was 1, the turbo would not lose boost ever (the maximum value can be 0.99, so it's not possible). If the value is 0, the AntiLag system doesn't do anything.
### AntiLag Chance
When one of the two conditions mentioned before happens, the OnAntiLag event on the CurrentCarStats instance on the controller gets invoked. The components that handle visual and sound effects listen to this event to do the flames popping out of the exhaust effects. Modify this value to change the chance at which the event will be triggered.
{% endtab %}
{% tab title="Transmission" %}
Transmission decides how much torque is provided to the wheels.
***
## Gear Ratios
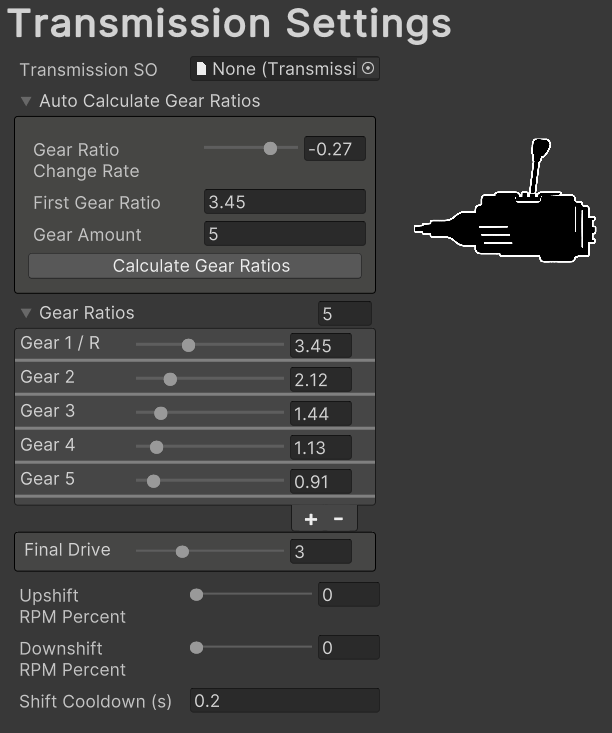
Transmission has a number of gears.
Every gear has a ratio, which is a multiplier to torque that is provided to the wheels.
The higher the ratio, the more torque the gear has at the cost of top speed, therefore as the gear index increases, the gear ratio lowers.
{% hint style="info" %}
You can use gear ratios calculator, built into the editor:

Gear ratio is calculated using the formula: **`first gear ratio * e^(change rate * index)`**
You can either calculate the whole gear ratios list by pressing the "Calculate Gear Ratios" button or by having the "Auto Calculate Gear Ratios" foldout opened and adding the gears by pressing the  "+" sign. The new gear ratio will be based on the current gear change rate value and the first gear ratio.
{% endhint %}
{% hint style="info" %}
In case you don't know what values to use, you can search for gear ratios of vehicles online.
{% endhint %}
***
## Final drive
Final drive is an additional multiplier to the current gear ratio.
{% hint style="info" %}
Adjusting final drive is an easy way to control vehicle acceleration and top speed.
{% endhint %}
***
## Shift cooldown
Shift cooldown defines how much time (in seconds) it takes to change gears. During this time the car cannot accelerate.
***
## Automatic transmission-specific fields
When the transmission type value on the controller script is set to Automatic, the following fields are used:
Upshift RPM Percent - RPM percent after which the automatic transmission will upshift.
Downshift RPM Percent - RPM percent at which the automatic transmission aims to land after downshift
{% endtab %}
{% tab title="Nitrous" %}
Nitrous provides additional boost to the engine while it's active.
***
### Boost Amount
Boost amount is the capacity of the nitrous bottle.
***
### Bottles Amount
Nitrous is stored in the bottles. Each bottle has a capacity of Boost Amount, meaning 4 bottles of 1000 boost amount = 4000 boost amount.
If the boost type is "Continuous", after a bottle gets depleted, the next one will be used.
If the boost type is "OneShot", after a bottle gets depleted, the boost ends and the user would have to initiate another boost from the next bottle.
***
### Boost Intensity
Boost intensity is the amount of boost that gets used per second. At the boost amount of 1000 and boost intensity of 500, an engine would get an additional 500 torque that would get used in 2 seconds.
***
### Boost Warm Up Time
Boost Warm Up Time is the time required to achieve the full effect of the boost intensity. The effect is achieved linearly in the specified time. The effect strength is accessible from the "NitroIntensity" property of CurrentCarStats (value is between 0 and 1).
***
### Boost During Warmup
Defines whether any amount of boost will be provided during the warmup time.
***
### Recharge Rate
Recharge rate - the amount of boost restored per second.
***
### Recharge Delay
Recharge delay - the amount of time that has to pass since the user last used nitrous to start recharging it.
***
### Min Percent To Use
Min Percent To Use - the minimum amount of nitrous currently (in percent) to start using it. If the amount gets lower when the user is already using nitrous, boosting won't stop.
***
### Boost Type
Boost Type defines the way that nitrous is used:
Continuous: provides boost as long as the player is pressing the boost button.
One shot: provides boost until the bottle is empty.
{% endtab %}
{% endtabs %}
## Handling Parts
{% tabs %}
{% tab title="Tires" %}
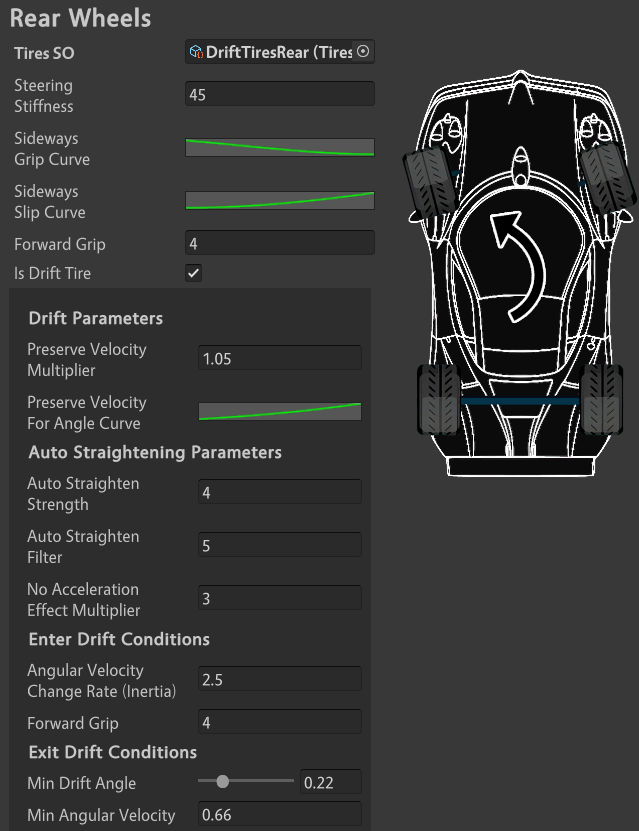
Tires define the steering and acceleration properties of the vehicle.
***
## Steering Stiffness
Steering stiffness defines the cornering ability of a vehicle. The higher the value, the more the wheels want to go in the direction they are facing. Therefore, low values are more suitable for drift and high values - for grip.
***
## Sideways Grip Curve
The sideways grip curve acts as a multiplier to the steering stiffness. The value is based on how fast the vehicle is going compared to the max speed it can reach (current car speed / max car speed.)
The sideways grip curve of a vehicle with a normal grip can look like this, letting the vehicle take sharp turns at low speeds but become less stable and understeery as the car reaches the top speed:
{% hint style="info" %}
Don't forget that the sideways grip curve is the multiplier of the steering stiffness.
If you change the curve, you should adjust the steering stiffness as well, expecting to have a steering stiffness \* key\[0] value at low speed and a steering stiffness value at top speed.
{% endhint %}
***
## Sideways Slip Curve
The sideways slip curve is another multiplier to the steering stiffness. It is based on the dot product of the vehicle movement and vehicle forward vector (the value is read from 1 - dot product).
At a value of 0 the car is moving precisely where it is facing, there is 0 slip, so a value of key\[0] will be used.
When the car is sliding perpendicularly, the slip equals 1, so a value of the last key will be used.
It gives the effect of the vehicle losing some traction and sliding, not being able to move in the way the tires are pointing.
{% hint style="info" %}
Note that the wheels that move perpendicularly to their forward vector should have maximum resistance to motion, so as the slip value approaches 1, the curve value should increase, like this:

{% endhint %}
***
## Forward Grip
The forward grip value defines how much force the wheel can handle before it starts slipping.
When accelerating, the weight of the vehicle shifts to the rear, increasing the load on the wheel axle. If the amount of torque provided to the drive wheel is bigger than the wheel load multiplied by the forward grip, the wheel starts slipping.
In case of the wheel slip, the car has slightly worse acceleration.
***
## Drift Tires
{% hint style="warning" %}
Drift tires have specific properties for the rear wheels. Even if you configure the drift tire values and assign the tire scriptable object to the front wheels, they will have no effect.
{% endhint %}
The first thing to note, if you used to make "drift" tires the old way, is that the drift tire should have normal steering stiffness and sideways grip curve values, like you would set on a grip tire.
**Until the tires lose traction, they will have the maximum steering stiffness (from the Steering Stiffness and Sideways Grip Curve) and will not take into account the Sideways Slip Curve.**
After losing traction, the tires will also start taking into account the Sideways Slip Curve. For proper drift, the curve should start with low values and eventually reach high value, simulating strong resistance to orthogonal motion.
Sideways Slip Curve example for the drift tire
## Drift Tire Properties (Applied only during drift)
### Preserve Velocity Multiplier
The "Preserve Velocity Multiplier" is a multiplier to the additional force (the tire's forward vector projected on the rigidbody's velocity), which helps the vehicle to maintain and gain speed during drift. Values too high can result in unnatural or broken acceleration, the recommended range of values is \[0.9-1.1]
### Preserve Velocity For Angle Curve
This curve is an additional multiplier to the "Preserve Velocity Multiplier" based on the angle of the drift. X-axis is the dot product between the vehicle's velocity and tire's right axis, Y-axis is a multiplier. Increasing the multiplier as the drift angle increases helps the car to not lose speed.
### Auto Straightening Strength
Auto Straightening Strength is a multiplier to the natural force that counteracts the drift force. Increasing this value can help exit the drift more easily, thus giving more control to the player. This value is scaled by the angle of the drift (the less the angle the higher the force) and rigidbody's angular velocity around the Y axis (rapid transitions during drift lower this force).
### Auto Straightening Filter
Auto Straightening Filter scales the amount of the force that straightens the vehicle depending on the drift angle. This value is used as a power the drift angle is taken to, thus increasing this value drastically lowers the influence of higher angle drifts.
### No Acceleration Effect Multiplier
"No Acceleration Effect Multiplier" multiplies the resulting straightening force when there is 0 acceleration input from the user.
## Drift Enter Conditions
{% hint style="info" %}
To enter the drift, at least 1 condition must be met.
{% endhint %}
### Angular Velocity Change Rate
"Angular Velocity Change Rate" is a threshold that can cause the vehicle to start drifting if overcame. This value is scaled by the rigidbody's angular drag, thus making drift initiation less likely at higher speed (drag is increased depending on the Vehicle Body's "Cornering Resistance Curve"). If tuned correctly, this value can make the vehicle enter the drift only by inertia drift (the angular acceleration of the rigidbody will be high after changing the movement direction quickly enough.)
### Forward Grip
"Forward Grip" property in the "Drift Parameters" is the same property that in your normal tires, it has been duplicated to show that it can be another reason for the vehicle to start drifting. If the torque, applied to the wheel is higher than the current load on the tire multiplied by the forward grip, the vehicle can start drifting. (load increases on the rear wheels during acceleration and reduces during deceleration).
{% hint style="info" %}
Another condition for entering the drift is a sudden increase in torque. If the torque change rate multiplied by the angular velocity around the Y axis is higher higher than the tire load multiplied by the tire's forward grip and vehicle's speed, the vehicle can start drifting. (Meaning the vehicle is turning at low speed and a large amount of torque is applied instantly to the wheels. If the speed is high, the car has lower power or the car isn't turning, this won't result in drift entry.)
{% endhint %}
{% hint style="info" %}
The handbrake guarantees drift entry in most cases as it increases the angular velocity of the car rapidly.
{% endhint %}
{% hint style="info" %}
If gas and brake input are provided at the same time and the gas input is higher or equal, this can help the car to enter the drift smoothly.
{% endhint %}
## Drift Exit Conditions
{% hint style="info" %}
To exit the drift, all conditions must be met
{% endhint %}
### Min Drift Angle
Drift Angle is represented as a dot product between the rigidbody's velocity and the tire's right axis. If the drift angle is below this value, the vehicle can stop drifting.
### Min Angular Velocity
If the rigidbody's angular velocity is below this value, the vehicle can stop drifting. Note that during drift transitions where the direction the vehicle is moving changes rapidly, the angular velocity will be higher than when just turning or drifting in 1 direction.
{% endtab %}
{% tab title="Suspension" %}
A suspension keeps the car above the ground and has an influence on body roll during steering.
***
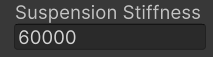
## Suspension Stiffness
The suspension stiffness defines the amount of force that is applied to the suspension to keep the car above the ground.
If the value is too low, the suspension won't be able to keep the vehicle at a desired height.
{% hint style="info" %}
Increasing suspension stiffness helps prevent body roll
{% endhint %}
***
## Damper Stiffness
The damper stiffness defines how much the suspension wants to travel. The lower the value, the less resistance the suspension has to movement. At a value of 0, the suspension won't ever stop wobbling.
***
## Suspension Height
A height that the suspension will try to keep the car above the ground.
{% hint style="info" %}
Lowering suspension height helps prevent body roll.
{% endhint %}
***
### Spring Travel Amount
Spring Travel Amount - the maximum allowed change in spring's length from its resting state. Affects the length of a raycast and the position of the wheel when it's in the air.
The recommended value is 30%-50% of the spring height.
***
## Antiroll Force
Antiroll force is applied to the vehicle depending on the difference between left and right suspension length.
This is the most impactful way to prevent the vehicle from flipping over at turns.
A recommended value is the half of suspension stiffness.
{% endtab %}
{% tab title="Brakes" %}
Brakes stop the car.
***
## Brakes Strength
The car is stopped by increasing the drag value of the Rigidbody component. The weight of the vehicle affects the stopping force.
***
## Handbrake Force
The handbrake applies stopping force to the rear wheels. Unlike brakes, the vehicle is stopped by adding force in the direction, opposite the the movement.
***
## Handbrake Traction Percent
Defines how much grip the rear tires have when the handbrake is pulled. It is a multiplier to the sideways grip of the tire.
{% endtab %}
{% tab title="Body" %}
The vehicle body defines the vehicle's resistance to motion.
***
## Mass
The mass of the Rigidbody component. As you would expect, it influences vehicle acceleration, turning, and stopping ability.
***
## Forward Drag
Forward drag acts as the vehicle's air resistance. The higher the drag, the worse the acceleration and top speed the vehicle can achieve.
***
## Downforce
Downforce adds force to the vehicle body in a downward direction. The higher the speed, the higher the effect. Helps with stabilizing the car and preventing rolling over.
***
## Cornering Resistance Strength
Cornering resistance simulates the vehicle control getting stiffer at high speeds.
Also has an effect of the vehicle velocity moving towards the vehicle forward vector, simulating wheels recentering at high speed.
***
## Cornering Resistance Curve
The cornering resistance curve acts as a multiplier to the cornering resistance strength based on the value of (current car speed / max car speed).
{% hint style="info" %}
Regardless of the handling type you are aiming for, having at least some cornering resistance improves handling by a big margin and makes drifting easier.

{% endhint %}
{% endtab %}
{% endtabs %}